Hump Operations 101 Training
Posted: Mon Sep 09, 2019 9:09 pm
Allow me to present a closer look at the the operation of the 'Hump'. We'll call this 'Hump 101'.
I will speak to the SoCal Run 8 simulation as provided with basic purchase.
There are two 'Hump Yards' in the SoCal simulation. Barstow and West Colton. Both Yards operate pretty much in the same manner with a few minor distinctions based on the topography of the yards themselves. I will attempt to address the differences between the two.
We will start with an orientation to address 'How to Start the Hump'. This holds true for either Barstow or West Colton's Hump.
1. You must be within a geographical distance (distance is unknown, but I suspect it's not much more than a 100 yards) of the Hump Tower. This is the location where the cars separate from the train and proceed down the back side of the hill into the 'Bowl'. Barstow has 15 tracks in the Bowl and West Colton has 19 tracks. The purpose for being this close to the 'Hump Tower' is to allow you access to the 'Hump Controller'. You access this control window via LCtr-F6. If you are outside the circle of influence to the Hump Tower, you will not be able to access the controller. This is IMPORTANT. Once you establish a link to the controller and you 'Activate it' (turn it on), you do not want to lose focus on the operation. Focus is defined as not moving away from the Hump Tower to perform another task. If you do move away while a train is being pushed over the hill, you run the risk (it's high) of the controller failing and then turning itself off. End result... cars moving down wrong tracks and the train continuing into the 'bowl' down the last assigned track. This is not good.
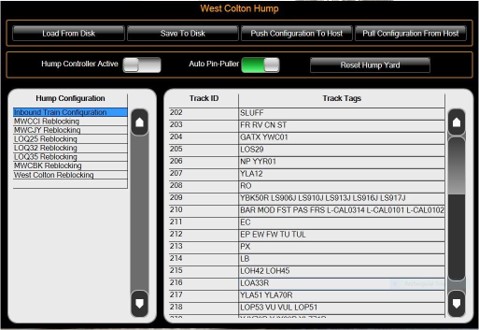
2. Once the 'Hump Control Window' is displayed via LCtr-F6, you will need to perform several steps to initiate and start of the Hump Controller. Here is a picture of the window.

Matter of Note: The above information does not reflect the 'Hump Configuration File' of the Depot+ or of HighBall. DO NOT select 'Load From Disk', 'Save To Disk', or 'Push Configuration To Host'.
There are 6 items that you need to pay attention too, to be successful in starting the Hump Controller.
First... You want to 'Pull Configuration From Host' as provided by the Highball Server.
Second... Check the Track ID and Track Tags window as having been properly populated
Third... Ensure that the 'Inbound Train Configuration' is highlighted in blue in the Hump Configuration window.
Fourth... You want to 'Reset Hump Yard' by selecting that button
Fifth... You want the 'Auto Pin-Puller to be active (Green)
Sixth... Turn on the Hump Controller by selecting the 'Hump Controller Active Slide' from white to green.
Once the above has be accomplished, close the 'Hump Controller Window' by selecting LCtr-F6 again.
With your train poised at the Hump Tower, it's now time to start the 'Push'.
First... Select LShift-C to display your HUD information and Select LCtr-F8 twice to display the car tags.
Second... Select F1. Under the Options Tab (lower left corner) ensure the 'Slow speed uses current speed' is turned off (White)
Third... Recommended 'Slow Speed fixed value' for humping is 2.5 ( this can vary from one yard to another and can adversely be affected by your internet latency value. The higher the Humping Speed, the higher the risk for Hump Controller Failure)
Fourth... In Barstow the train is pushed up hill to the apex. Select Notch 3 and allow the train to push.
In West Colton, the train is actually coming down hill from the receiving yard and you will have to set different power and brake pressures to prevent over-speeding the Hump Controller.
Select Notch 1 and initially apply 20-24 psi Braking. Watch the speed of your train.
My technique ( and it's just that a technique and not a procedure), If your speed starts to fall below 2.5, reduce the brake pressure to about 18. Continue monitoring the speed and adjust brakes accordingly. The longer and heavier the train, the more braking will be required.
What's important here is... you risk "Hump Controller Failure" if your train is too fast. The failure is not in the separation of the cars, but the time between separation on a set of cars relative to the next set. The controller not only separates the cars via the 'Auto Pin-Puller', but it also controls the switches and 'squeezers' (speed controller) in the bowl area. If cars are humped too fast there is not enough distance between cars and the controller can not route the car correctly, hence it will report a failure when it detects a car going through a switch that it shouldn't have.
Hope 'Humping 101' helped your understanding.
I will speak to the SoCal Run 8 simulation as provided with basic purchase.
There are two 'Hump Yards' in the SoCal simulation. Barstow and West Colton. Both Yards operate pretty much in the same manner with a few minor distinctions based on the topography of the yards themselves. I will attempt to address the differences between the two.
We will start with an orientation to address 'How to Start the Hump'. This holds true for either Barstow or West Colton's Hump.
1. You must be within a geographical distance (distance is unknown, but I suspect it's not much more than a 100 yards) of the Hump Tower. This is the location where the cars separate from the train and proceed down the back side of the hill into the 'Bowl'. Barstow has 15 tracks in the Bowl and West Colton has 19 tracks. The purpose for being this close to the 'Hump Tower' is to allow you access to the 'Hump Controller'. You access this control window via LCtr-F6. If you are outside the circle of influence to the Hump Tower, you will not be able to access the controller. This is IMPORTANT. Once you establish a link to the controller and you 'Activate it' (turn it on), you do not want to lose focus on the operation. Focus is defined as not moving away from the Hump Tower to perform another task. If you do move away while a train is being pushed over the hill, you run the risk (it's high) of the controller failing and then turning itself off. End result... cars moving down wrong tracks and the train continuing into the 'bowl' down the last assigned track. This is not good.
2. Once the 'Hump Control Window' is displayed via LCtr-F6, you will need to perform several steps to initiate and start of the Hump Controller. Here is a picture of the window.

Matter of Note: The above information does not reflect the 'Hump Configuration File' of the Depot+ or of HighBall. DO NOT select 'Load From Disk', 'Save To Disk', or 'Push Configuration To Host'.
There are 6 items that you need to pay attention too, to be successful in starting the Hump Controller.
First... You want to 'Pull Configuration From Host' as provided by the Highball Server.
Second... Check the Track ID and Track Tags window as having been properly populated
Third... Ensure that the 'Inbound Train Configuration' is highlighted in blue in the Hump Configuration window.
Fourth... You want to 'Reset Hump Yard' by selecting that button
Fifth... You want the 'Auto Pin-Puller to be active (Green)
Sixth... Turn on the Hump Controller by selecting the 'Hump Controller Active Slide' from white to green.
Once the above has be accomplished, close the 'Hump Controller Window' by selecting LCtr-F6 again.
With your train poised at the Hump Tower, it's now time to start the 'Push'.
First... Select LShift-C to display your HUD information and Select LCtr-F8 twice to display the car tags.
Second... Select F1. Under the Options Tab (lower left corner) ensure the 'Slow speed uses current speed' is turned off (White)
Third... Recommended 'Slow Speed fixed value' for humping is 2.5 ( this can vary from one yard to another and can adversely be affected by your internet latency value. The higher the Humping Speed, the higher the risk for Hump Controller Failure)
Fourth... In Barstow the train is pushed up hill to the apex. Select Notch 3 and allow the train to push.
In West Colton, the train is actually coming down hill from the receiving yard and you will have to set different power and brake pressures to prevent over-speeding the Hump Controller.
Select Notch 1 and initially apply 20-24 psi Braking. Watch the speed of your train.
My technique ( and it's just that a technique and not a procedure), If your speed starts to fall below 2.5, reduce the brake pressure to about 18. Continue monitoring the speed and adjust brakes accordingly. The longer and heavier the train, the more braking will be required.
What's important here is... you risk "Hump Controller Failure" if your train is too fast. The failure is not in the separation of the cars, but the time between separation on a set of cars relative to the next set. The controller not only separates the cars via the 'Auto Pin-Puller', but it also controls the switches and 'squeezers' (speed controller) in the bowl area. If cars are humped too fast there is not enough distance between cars and the controller can not route the car correctly, hence it will report a failure when it detects a car going through a switch that it shouldn't have.
Hope 'Humping 101' helped your understanding.